- Weekly and Daily Structure: XLM remains bullish on larger timeframes, reacting to a key supply zone after sweeping liquidity
- H4 Bearish Trend: Despite the bullish higher timeframes, the H4 chart shows a bearish structure with lower highs and lows
- Fractal Markets: Similar patterns are visible across timeframes, with liquidity sweeps and reactions to supply zones providing trading opportunities
When analyzing Stellar (XLM), understanding the price action across multiple timeframes can reveal valuable trading opportunities. Let’s dive into the structure of the market and discuss possible scenarios for XLM’s next move.
Weekly Timeframe: Testing a Key Supply Zone
On the Weekly timeframe, Stellar has reached a critical supply zone.
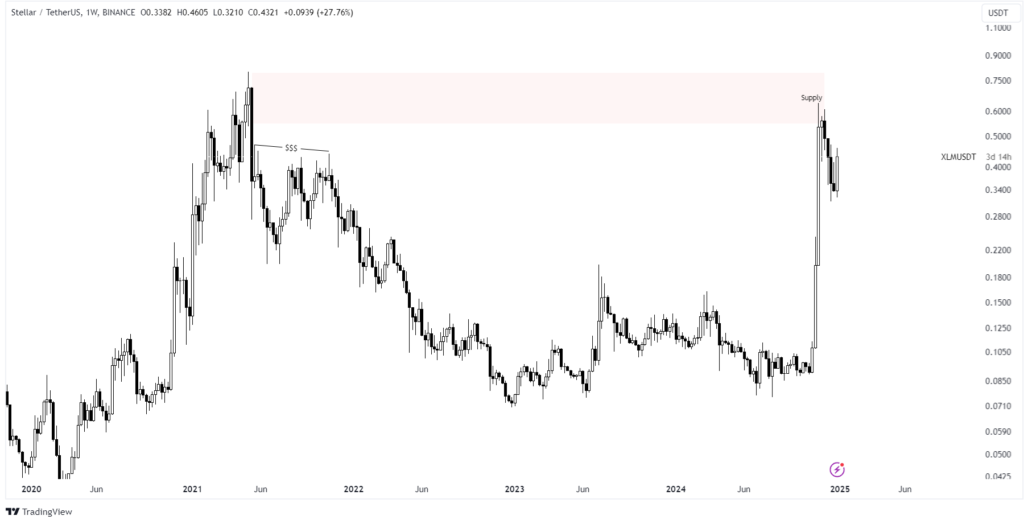
A supply zone refers to an area where sellers are expected to dominate, often leading to a price reversal. This is particularly significant because the price previously swept liquidity—areas where stop-loss orders or pending orders accumulate—on the left side of the chart.
The market structure on both Weekly and Daily timeframes remains bullish, showing higher highs and higher lows. This indicates strong momentum to the upside, but caution is still advised.
H4 Timeframe: A Bearish Perspective
Zooming into the H4 timeframe, we notice a stark contrast.

The market structure here is bearish, with the price forming lower highs and lower lows. A bearish market structure reflects consistent selling pressure and a downward trend.
H1 Timeframe: Fractal Price Action
On the H1 timeframe, Stellar displays an interesting pattern. Similar to the Weekly chart, it swept liquidity on the left and reacted to a supply zone.

This highlights the fractal nature of markets, meaning that price movements on smaller timeframes often mirror those on larger ones, albeit in a condensed form.
What’s Next? Possible Scenarios
Currently, Stellar presents two potential paths, depending on how the price reacts:
- Bearish Continuation: The price could continue to drop, especially if it sweeps the liquidity sitting above and reacts negatively to the supply zone. This would align with the bearish structure visible on H4.

- Bullish Continuation: On the other hand, the strong bullish momentum seen on the Weekly and Daily timeframes could prevail. The price might sweep liquidity below before reversing and pushing higher.

Regardless of the scenario, risk management is key.
For those looking to short, wait for confirmation with a change in structure on lower timeframes. For long entries, ensure the price reacts strongly to a demand zone or liquidity sweep.
Final Thoughts
Trading Stellar—or any asset—is about probabilities, not certainties. While the scenarios discussed are grounded in technical analysis, the market can be unpredictable. Always remain flexible and adjust your strategies accordingly.
What’s your take on Stellar’s next move?
Disclaimer: The information provided in this article is for informational and educational purposes only and does not constitute financial, investment, or trading advice. Any actions you take based on the information provided are solely at your own risk. We are not responsible for any financial losses, damages, or consequences resulting from your use of this content. Always conduct your own research and consult a qualified financial advisor before making any investment decisions.