
- Break of Structure Observed: HBAR recently shifted structure, creating a new supply zone for potential bearish moves
- Critical Levels to Watch: A key demand zone lies below liquidity, presenting a potential entry for buyers
- Stay Flexible: While setups are promising, the market remains unpredictable—be prepared with proper risk management
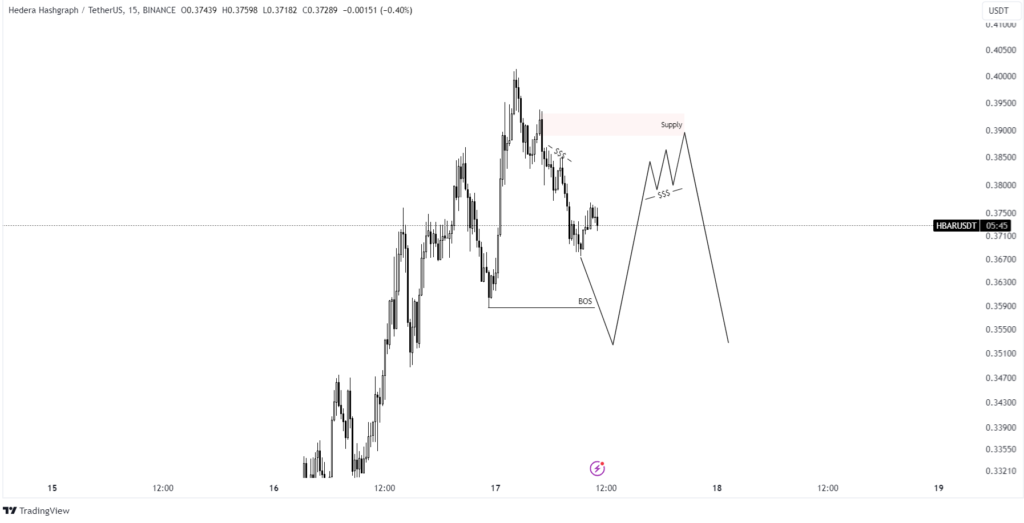
In our previous analysis of HBAR, we discussed how the asset had recently taken significant liquidity on higher timeframes (H4).

This action hinted at a potential bearish reaction—and that’s precisely what unfolded. At the time, I recommended waiting for a structural change on the M15 chart before considering selling from the supply zone responsible for breaking the structure.
What Happened Next?
After the break of structure (BOS), HBAR created liquidity below, setting up a potential target for the price to revisit later. It then moved upward, touching the supply zone that triggered the M15 structural shift from bullish to bearish.

This sequence aligned closely with the predictions outlined in the last analysis.
Current Scenarios to Watch
Two supply zones currently catch my attention:
- A New Supply Zone Near Liquidity: Here, caution is essential. Protect yourself with a breakeven strategy after any reaction, as the zone above looks like liquidity the price might grab before turning bearish.
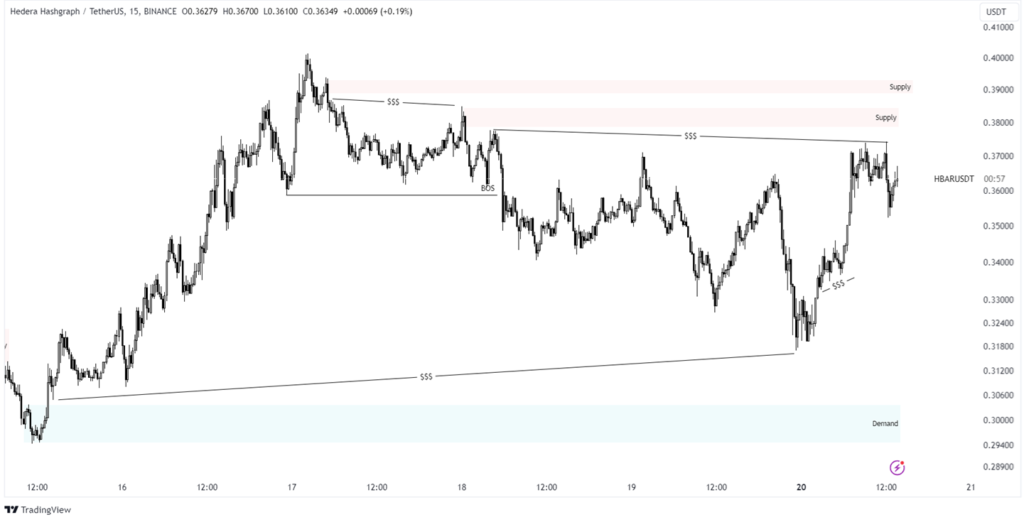
- The Previously Marked Supply Zone: This area remains valid. Located slightly higher, this supply zone offers another opportunity for a reaction.
If you anticipate that the price could rise instead, there’s only one demand zone I find compelling. This area sits below some liquidity that could act as a magnet for the price before any upward movement.
Risk Management Reminder
While these scenarios provide a roadmap for potential trades, remember that the market can be unpredictable.
The setups described are possibilities, not guarantees. Always approach trades with caution, and consider employing the breakeven technique after an initial reaction to minimize risk.
Key Takeaways
- HBAR has followed a textbook liquidity and structure setup on higher and lower timeframes.
- The previously marked supply zone is still in play but requires careful risk management.
- The demand zone below remains the most interesting level for potential buys if the price moves upward.
HBAR’s movements continue to provide fascinating trading opportunities. Keep your eyes on these levels and prepare for what could be the next decisive moves in the market.
Disclaimer: The information provided in this article is for informational and educational purposes only and does not constitute financial, investment, or trading advice. Any actions you take based on the information provided are solely at your own risk. We are not responsible for any financial losses, damages, or consequences resulting from your use of this content. Always conduct your own research and consult a qualified financial advisor before making any investment decisions.